Voice Control App for iOS
About
This example demonstrates how to build a voice-controlled iOS application using SwitchboardSDK with real-time speech recognition. The app showcases navigation and interaction with UI elements through voice commands, combining Whisper STT (Speech-to-Text) and Silero VAD (Voice Activity Detection) for accurate and responsive voice control. Users can navigate through a movie list, like/dislike items, expand descriptions, and jump to specific items by speaking their names.
Architecture Overview
The architecture of this example application comprises of three layers:
- Audio Processing Pipeline - Switchboard SDK's AudioGraph for speech to text
- Trigger Detection - Keyword matching and trigger detection system
- Swift UI Layer - User interface that responds to keyword detection
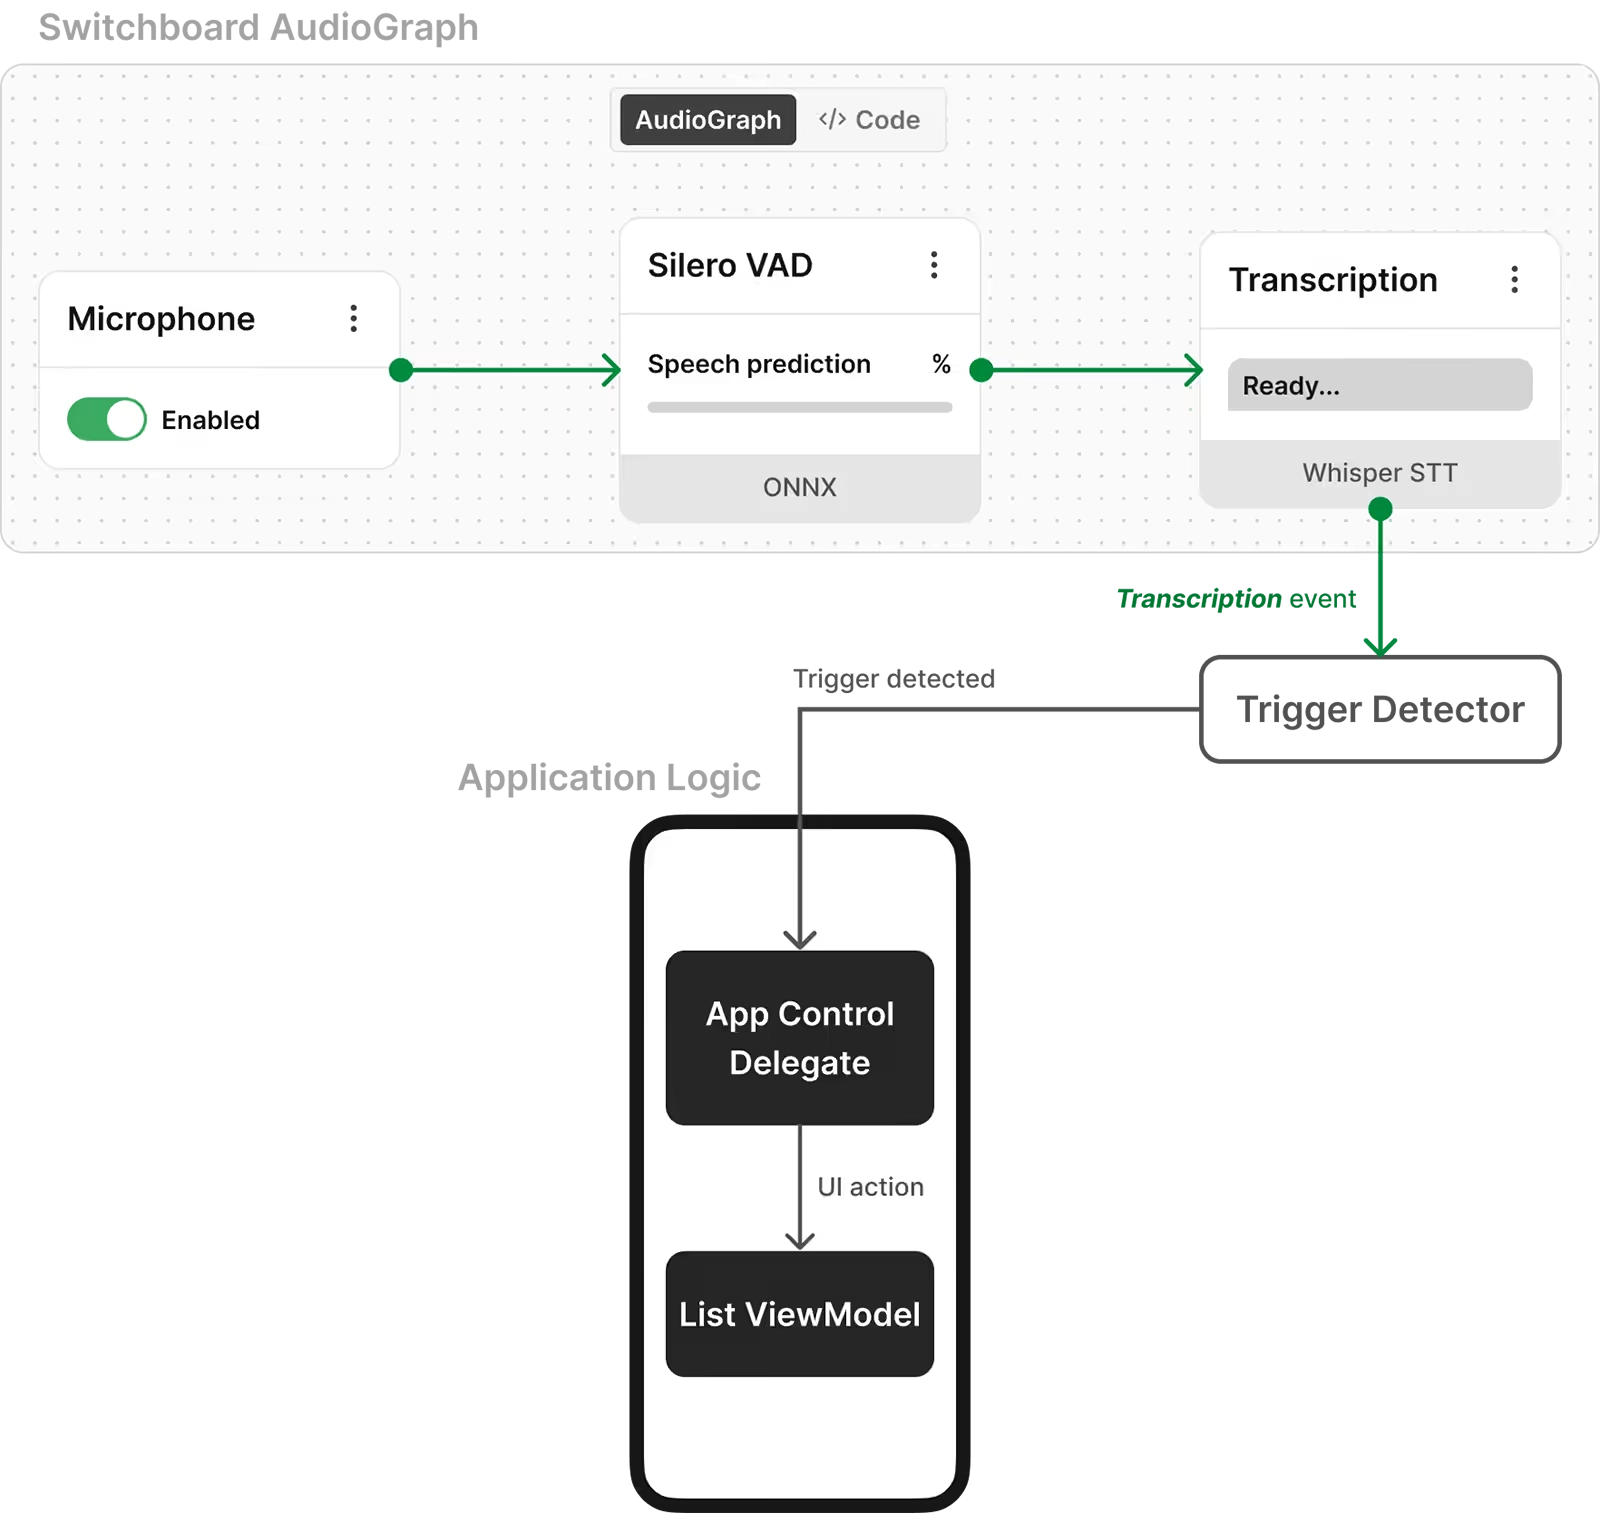
This diagram illustrates an AudioGraph and how it drives the application logic (in this case, a voice-controlled media player). AudioGraphs like this can be created in JSON using the Switchboard Editor. (Note: Trigger Detector is not included in the SDK).
Project Structure
AppControlExample/
├── AppControl/
│   ├── AppControlExample.swift      # Swift implementation with SwitchboardSDK integration
│   ├── TriggerDetector.swift        # Swift trigger detection and command processing
│   ├── AppControlView.swift         # Main SwiftUI view
│   ├── ListView.swift               # Movie list UI components
│   ├── DataModels.swift             # Data models and sample movie data
│   └── AudioGraph.json              # Audio processing pipeline configuration
├── AppControlExampleApp.swift       # App entry point with SDK initialization

scripts/
└── setup.sh                        # Framework download and setup script
Implementation
Voice Processing Pipeline
The example implements an audio pipline that captures audio from microphone, processes voice via Whisper Speech-To-Text, processes text output from Speech-To-Text engine and matches keywords defined by the app.
Microphone Input → Voice Activity Detection → Speech To Text
The audio processing pipeline is defined in AudioGraph.json, creating a real-time speech recognition system:
//AudioGraph.json

{
  "type": "RealTimeGraphRenderer",
  "config": {
    "microphoneEnabled": true,
    "graph": {
      "config": {
        "sampleRate": 16000,
        "bufferSize": 512
      },
      "nodes": [
        {
          "id": "multiChannelToMonoNode",
          "type": "MultiChannelToMono"
        },
        {
          "id": "busSplitterNode",
          "type": "BusSplitter"
        },
        {
          "id": "vadNode",
          "type": "Silero.VAD",
          "config": {
            "frameSize": 512,
            "threshold": 0.5,
            "minSilenceDurationMs": 40
          }
        },
        {
          "id": "sttNode",
          "type": "Whisper.STT",
          "config": {
            "initializeModel": true,
            "useGPU": true
          }
        }
      ],
      "connections": [
        {
          "sourceNode": "inputNode",
          "destinationNode": "multiChannelToMonoNode"
        },
        {
          "sourceNode": "multiChannelToMonoNode",
          "destinationNode": "busSplitterNode"
        },
        {
          "sourceNode": "busSplitterNode",
          "destinationNode": "vadNode"
        },
        {
          "sourceNode": "busSplitterNode",
          "destinationNode": "sttNode"
        },
        {
          "sourceNode": "vadNode.end",
          "destinationNode": "sttNode.transcribe"
        }
      ]
    }
  }
}
- Microphone Input → Capture audio at 16kHz
- Multi-Channel to Mono → Make sure we have mono signal for processing
- Bus Splitter → Split audio for parallel VAD and STT processing
- Voice Activity Detection → Detect speech start/end point
- Speech To Text → Convert speech to text when voice activity (end event) is detected
Important thing to note here is that Whisper STT works with 16000 hz sample rate,
SwitchboardSDK setup
Initialization
The app initializes SwitchboardSDK with required extensions in AppControlExampleApp.swift:
// AppControlExampleApp.swift
    SBSwitchboardSDK.initialize(withAppID: "YOUR_APP_ID", appSecret: "YOUR_APP_SECRET")
    SBWhisperExtension.initialize(withConfig: [:])
    SBSileroVADExtension.initialize(withConfig: [:])
Engine setup
Engine creation and transcription event handling
// AppControlExample.swift

func createEngine() {
    guard let filePath = Bundle.main.path(forResource: "AudioGraph", ofType: "json"),
          let jsonString = try? String(contentsOfFile: filePath, encoding: .utf8)
    else {
        print("Error reading JSON file")
        return
    }

    guard let jsonData = jsonString.data(using: .utf8),
          let config = try? JSONSerialization.jsonObject(with: jsonData) as? [String: Any]
    else {
        print("Error parsing JSON")
        return
    }

    let createEngineResult = Switchboard.createEngine(withConfig: config)
    engineID = createEngineResult.value! as String

    // Listen for transcription events
    let listenerResult = Switchboard.addEventListener("sttNode", eventName: "transcribed") { [weak self] eventData in
        guard let self = self,
              let transcriptionText = eventData as? String else { return }

    // Send the transcribed text to trigger detector
        let result = TriggerDetector.detectTrigger(transcriptionText)

        if result.detected {
          // On detecting a trigger send the detected keyword to UI layer
            DispatchQueue.main.async {
                self.delegate?.triggerDetected(result.triggerType, withKeyword: result.keyword)
            }
        }
    }
}
SwiftUI Voice Control Interface
The SwiftUI interface provides reactive updates based on voice commands:
// AppControlView.swift

func triggerDetected(_ triggerType: TriggerType, withKeyword keyword: String) {
    DispatchQueue.main.async {
        self.detectedKeyword = keyword
        switch triggerType {
        case .down:
            self.verticalListViewModel?.down()
        case .up:
            self.verticalListViewModel?.up()
        case .like:
            self.verticalListViewModel?.toggleLike()
        case .dislike:
            self.verticalListViewModel?.toggleDislike()
        case .expand:
            self.verticalListViewModel?.toggleExpand()
        case .runtimeTriggers:
            // Find movie by title and select it
            if let movieIndex = self.verticalListViewModel?.items.firstIndex(where: {
                $0.title.lowercased() == keyword
            }) {
                self.verticalListViewModel?.selectItem(at: movieIndex)
            }
        }
    }
}
Trigger Detection
We define trigger types and keywords for each trigger type
// AppControlExample.swift

enum TriggerType: Int {
    case next, back, like, dislike, expand, runtimeTriggers, unknown
}

// Keywords organized by trigger type
private static var triggerKeywords: [TriggerType: [String]] = [
    .down: ["down", "forward", "next"],
    .up: ["up", "last", "previous", "back"],
    .like: ["like", "favourite", "heart"],
    .dislike: ["dislike", "dont like", "do not like"],
    .expand: ["expand", "details", "open"],
    .runtimeTriggers: []
]
TriggerDetector contains logic to detect keywords
// TriggerDetector.swift

static func detectTrigger(_ phrase: String) -> TriggerResult {
    let cleanedPhrase = clean(phrase)
    var bestLength = 0
    var bestTriggerType: TriggerType = .unknown
    var bestKeyword = ""

    for (triggerType, keywords) in triggerKeywords {
        let match = findLongestMatch(cleanedPhrase, keywords: keywords)
        if !match.isEmpty && match.count > bestLength {
            bestTriggerType = triggerType
            bestLength = match.count
            bestKeyword = match
        }
    }

    let detected = bestLength > 0
    return TriggerResult(triggerType: bestTriggerType, keyword: bestKeyword, detected: detected)
}
Example App Features
Voice Navigation Commands
Navigate through the interface using natural speech:
- Keywords to navigate to next item: down, next, forward
- Keywords to navigate to previous item: up, back, last, previous
Voice Action Commands
Interact with content using voice:
- Keywords to like item:
like,favourite,heart - Keywords to disklike item:
dislike,dont like - Keywords see details:
expand,details,open
Runtime Voice Triggers
Jump directly to specific content by name:
let movieTitles = DataSource.shared.movieData.map { $0.title }
example?.setRuntimeTriggers(movieTitles)
Voice Activity Detection
We can optimize voice activity detection by adjusting various parameters of the Silero VAD node.
{
  "id": "vadNode",
  "type": "Silero.VAD",
  "config": {
    "frameSize": 512,
    "threshold": 0.5,
    "minSilenceDurationMs": 40
  }
}
Engine Lifecycle Management
Control the voice recognition engine lifecycle:
// AppControlExample.swift
func startEngine() {
    Switchboard.callAction(withObject: engineID, actionName: "start", params: nil)
}

func stopEngine() {
    Switchboard.callAction(withObject: engineID, actionName: "stop", params: nil)
}
Source Code
You can find the source code on the following link:
Voice Controlled App Example - iOS